Hello dear friends,
Anyone there still? I can't believe it has been so long since I have been on the site. Crazy! So much in life has happened I can't even begin to explain it all but I am back with a new computer to use, a fresh keyboard to break in and I am ready to roll. This summer has been crazy hot, I can't even believe it. We were at church camp last week and I thought I might die from all of the heat. So, I thought I would share one of my favorite drink recipe with some of you guys. So sit back and sip away! Happy summer!
Fruit Tea (apparently, it's a Southern thing!)
4-Family size tea bags
3/4 c sugar
1 can frozen pineapple orange juice concentrate, thawed
Fresh lime or orange slices or mint for garnish (optional)
Bring 4 cups of water to a boil. When it boils turn off the heat and stir in your sugar. Add the tea bags and let it steep in the water for at least 20 minutes.
After 20 minutes, pour your tea into a large pitcher along with the frozen juice concentrate and add approx 12 cups of water (depending on how strong or weak you like your drink. Garnish and serve over ice.
Enjoy!
Thursday, July 28, 2011

Tuesday, January 11, 2011
Snow, Snow Go Away - Creamy Chicken and Barley Soup
It is cold. We have had around 5 inches of snow fall in the last 24 hours and this morning I awoke to my oldest muffin sick as a dog. Lovely. I don't know about you but when it is this cold outside I want nothing more than to sit and do nothing. My taste buds also seem to kick into overdrive and I crave everything that is NOT in this house and that I can't possibly make with the pantry items I have on hand. Last year when we had a snow storm I ordered from the local Chinese food place that delivered thinking they would be closed and not only did they deliver but the poor guy had to park at the bottom of our hill and run the food up so I had to give him a huge tip. I don't have the heart to do that again, as good as lo mein sounds.
But, if you are anything like me you are sick of the same old soups of chicken and rice, chicken with noodles, chicken and dumplings, chicken tortilla, you get my point. So, I thumbed through a few recipes and decided to combine a couple to make a new soup. The salesman's grandmother is famous for a wild rice soup that she makes every Christmas day that I love. I found a recipe that was similar to her soup and added what I did had on hand and it turned out very tasty. I am attempting to eat lower-carb and for some reason I feel like I did with this, despite the fact there are a few carbs in it. It is a relatively low fat soup that you can adjust to fit what you have on hand. Stay warm and Enjoy!
Creamy Chicken and Barley Soup
2 Chicken breasts
olive oil, salt and pepper
Drizzle the olive on and s&p on the chicken. Roast at 425 for 15-20 minutes until chicken is cooked through. Once cooked, chop chicken and set aside. *You could also use 2 cups of shredded rotisserie chicken.
2 stalks celery diced
1 small onion diced
2 large carrots diced
2 cloves of garlic minced
6 oz button mushrooms(approx 12 standard size) chopped (I always prefer fresh but you could use a can)
6 cups chicken stock (I use water and add better than bullion chicken base)
1/2 tsp dry mustard
1/4 tsp curry powder
2 heaping Tbsp flour
1 cup barley (I had quick cooking)
1/2 cup milk or cream
1/3 cup sherry
In the bottom of a large pot over medium heat, warm 2 tsp of olive oil. Add celery, onions and carrots and a sprinkle of salt and pepper to the olive oil and sautee until soft, around 5-8 minutes. Next, add garlic and mushrooms and sautee for 3 minutes, stirring occasionally. Stir in mustard, curry and flour and let cook for 1 minute so that the raw flour taste can cook off of the veggies. Next, pour in chicken stock and chicken and another splash of s&p and allow it to come to a boil. Reduce heat to med-low and add barley. Cover the pot with a tight fitting lid and allow barley to cook for 15 minutes, stirring occasionally. Once barley has become soft add in milk and sherry and allow it to simmer for 15 minutes to let the alcohol cook out. Serve with some crusty bread and a big salad and enjoy!
But, if you are anything like me you are sick of the same old soups of chicken and rice, chicken with noodles, chicken and dumplings, chicken tortilla, you get my point. So, I thumbed through a few recipes and decided to combine a couple to make a new soup. The salesman's grandmother is famous for a wild rice soup that she makes every Christmas day that I love. I found a recipe that was similar to her soup and added what I did had on hand and it turned out very tasty. I am attempting to eat lower-carb and for some reason I feel like I did with this, despite the fact there are a few carbs in it. It is a relatively low fat soup that you can adjust to fit what you have on hand. Stay warm and Enjoy!
Creamy Chicken and Barley Soup
2 Chicken breasts
olive oil, salt and pepper
Drizzle the olive on and s&p on the chicken. Roast at 425 for 15-20 minutes until chicken is cooked through. Once cooked, chop chicken and set aside. *You could also use 2 cups of shredded rotisserie chicken.
2 stalks celery diced
1 small onion diced
2 large carrots diced
2 cloves of garlic minced
6 oz button mushrooms(approx 12 standard size) chopped (I always prefer fresh but you could use a can)
6 cups chicken stock (I use water and add better than bullion chicken base)
1/2 tsp dry mustard
1/4 tsp curry powder
2 heaping Tbsp flour
1 cup barley (I had quick cooking)
1/2 cup milk or cream
1/3 cup sherry
In the bottom of a large pot over medium heat, warm 2 tsp of olive oil. Add celery, onions and carrots and a sprinkle of salt and pepper to the olive oil and sautee until soft, around 5-8 minutes. Next, add garlic and mushrooms and sautee for 3 minutes, stirring occasionally. Stir in mustard, curry and flour and let cook for 1 minute so that the raw flour taste can cook off of the veggies. Next, pour in chicken stock and chicken and another splash of s&p and allow it to come to a boil. Reduce heat to med-low and add barley. Cover the pot with a tight fitting lid and allow barley to cook for 15 minutes, stirring occasionally. Once barley has become soft add in milk and sherry and allow it to simmer for 15 minutes to let the alcohol cook out. Serve with some crusty bread and a big salad and enjoy!
Monday, January 3, 2011
Re-Charged
Wow. It has been a while. Is anyone still there? I have taken a break from typing the last two months, not by choice but when you have a million Trojans decided to eat up your hard drive you are not left with too many choices other than to close up the computer and just walk away. So much has happened since we last talked. We have had many of my favorite holidays pass us by and personal celebrations for me including my 30th birthday and 7th wedding anniversary. December was a totally nutso month for me, between cooking, baking, catering, working, wrapping, traveling, decorating...there was not much time to sit and reflect on too much. But, I love the New Years day and eve celebrations and the fresh start that you are able to get every year. It is like changing out the batteries on an old toy for my babies and seeing their faces light up with excitement over something that was once old but is now new again. This year I have put forth many goals, not really resolutions but just things that I need to do. There are many areas in my life that I feel have been put on the back burner for a long time but this year I am going to take care of me. I want to shed a few pounds, read a few books, pay off some debt and hopefully work my way into being one step closer into owning my own place. I have been dreaming for several months now about opening up the Yellow Rose. I have laid awake many nights dreaming of my turquoise tables and ladder back chairs and what my menu will look like and the kind of boots I want to wear with my apron opening day. I tend to dream in full on color with lights flashing and cameras rolling but I am ready to put that dream in place. Please pray for me and my goals as I pray for you and yours. I pray that your goals will make you a better believer and follower of God and the unbelievable power that he has over our lives and that you will ask for His faithful provisions as he leads you and your loved ones into this next year. Cheers!
Friday, October 29, 2010
Awwww Nuts! - Sugared Pecans
I have not always loved nuts. In fact, I still don't care for nuts when they are baked in things like cookies, brownies, cakes, etc since I am a purist. But one thing I do love are sugared nuts, especially in fun salads. I love making salad and try to have that on my menu for most dinner parties. I have a house dressing (which I might share at a later date but today is not that day) that is great with every topping under the sun, especially sugared nuts. I usually have peanuts, some sliced almonds and smoked almonds on hand at any given time and I try to keep some pecans in the freezer for a last minute party to make some nuts. So, when you are needing to impress your guests, whether it is your mother in law (although her life motto is "absence of vegetation") or your boss (thank goodness mine is easily impressed) throw together a spinach salad topped with these babies and you will be set. But first, lets review the nut rules.
1. Only use FRESH nuts. I think this is the reason I have been so scared is because I grew up on old gross Texas pecans that were way past their prime because they had become lost in the bottom of the freezer at my moms house. You know when you have a bad nut, and no amount of butter or sugar will make it taste good!
2. You can freeze nuts, I will buy a bag and stick them straight into the freezer (only nuts you will eventually bake with, not snacking nuts). Nuts will stay fresh in your freezer for up to 4 months if they are in an air tight container. This will allow you to pull out the amount you need and save the rest for later.
3. I prefer walnuts, almonds (slivered or sliced) or pecans with making a salad because they have a great texture. I really prefer sliced almonds the best because they get crispy crunchy and don't have the buttery after taste that walnuts do.
4. Once you have cooked these sugared nuts you can refreeze them and save them for the next use.
5. Make sure the nuts have totally cooled before adding to the salad or it will make the lettuce wilty. YUCK!!!
3/4 Cup nuts of choice
1 Tbs butter
1/2 tsp cinnamon
1 Tsp brown sugar
dash of salt
In a sauce pan place all ingredients and stir and place on med-low heat. Too hot and you will burn the nuts!! Let the nuts cook for approx 12 minutes and continue to stir every few minutes to make sure the nuts are thoroughly coated and that they don't burn. Once you get a toasty nut smell you are know they are done. Spread cooked nuts on parchment, wax or foil and allow to cool. Break up and enjoy!
1. Only use FRESH nuts. I think this is the reason I have been so scared is because I grew up on old gross Texas pecans that were way past their prime because they had become lost in the bottom of the freezer at my moms house. You know when you have a bad nut, and no amount of butter or sugar will make it taste good!
2. You can freeze nuts, I will buy a bag and stick them straight into the freezer (only nuts you will eventually bake with, not snacking nuts). Nuts will stay fresh in your freezer for up to 4 months if they are in an air tight container. This will allow you to pull out the amount you need and save the rest for later.
3. I prefer walnuts, almonds (slivered or sliced) or pecans with making a salad because they have a great texture. I really prefer sliced almonds the best because they get crispy crunchy and don't have the buttery after taste that walnuts do.
4. Once you have cooked these sugared nuts you can refreeze them and save them for the next use.
5. Make sure the nuts have totally cooled before adding to the salad or it will make the lettuce wilty. YUCK!!!
3/4 Cup nuts of choice
1 Tbs butter
1/2 tsp cinnamon
1 Tsp brown sugar
dash of salt
In a sauce pan place all ingredients and stir and place on med-low heat. Too hot and you will burn the nuts!! Let the nuts cook for approx 12 minutes and continue to stir every few minutes to make sure the nuts are thoroughly coated and that they don't burn. Once you get a toasty nut smell you are know they are done. Spread cooked nuts on parchment, wax or foil and allow to cool. Break up and enjoy!
Thursday, October 28, 2010
Blessed - Pumpkin Bars
For the past two years a group of moms from church has been meeting together religiously every Thursday night at a local Panera. We started as a book club/bible study group but over time we have become a counseling/support system for each other. We have a designated table at the restaurant that we claim weekly and throughout the night we will see many come and go as we sip on our lattes and share our latest life story. We usually sound like a group of hens clucking at the top of their lungs as we sit and discuss life, marriage, children, love, heart break pain, any and every topic. Many of us have had our first, second, or third child since this group began and it has been amazing to watch these babies grow up week by week and share stories of them taking their first steps, first real food, sleeping through the night, etc.
Tonight I hosted the girls here for a night of soup and salad and coffee. Every once in a while I will speak up and voice my concern for how much money we are dumping into Paneras pocket and how I can't handle another Greek salad with extra olives and a bowl of chicken soup so I decided to just have everyone here instead. What a blessing. To know that if it were not for the Father that our lives would not be woven together like a patch work quilt. I love sitting back and watching everyone and listening to the bustle of conversations knowing that we all need each other, depend on each other and are here for one another and that if I am ever in a crisis I can call on any of these girls and I know that they will come and help whatever it takes.
Tonight for the menu I prepared a broccoli cheese soup, spinach salad with apples, bacon, blue cheese and my house dressing and for dessert we had some gooey pumpkin bars with coffee. I love, love gooey butter bars. They are one of my most favorite desserts.I have always had a long time love affair with chess pie and gooey butter bars help fill that gap in my life. My local Kroger use to carry their own version of the bars and it was T-R-O-U-B-L-E. Well, tonight I decided to try out Paula De ens recipe for gooey pumpkin bars and add my own touch and they were the perfect end to a perfect night. Thank you God fort the blessing of friends. Enjoy!
1 Butter Cake Boxed Mix
1 Stick of butter melted
1 Egg
Combine all of the above and pat into a 9x13 pan.
1 8oz cream cheese at room temp
2 eggs
1 tsp vanilla
1 stick of butter melted
2 cups powdered sugar
2 tsp pumpkin pie spice
1 15 oz can pumpkin
1 dash salt
1/.4 tsp ginger
Beat cream cheese until smooth. Next add in pumpkin, eggs then the rest of the ingredients. Spread over the cake mixture. Bake at 350 for 50 minutes, the center should still be a bit gooey. Allow to cool then top with glaze.
1 cup powdered sugar
1 Tbs half and half or milk
1/2 tsp pumpkin pie spice
Stir until combined. Drizzle over cooled bars. If glaze is not coming together all the way add a splash more half and half.
Tonight I hosted the girls here for a night of soup and salad and coffee. Every once in a while I will speak up and voice my concern for how much money we are dumping into Paneras pocket and how I can't handle another Greek salad with extra olives and a bowl of chicken soup so I decided to just have everyone here instead. What a blessing. To know that if it were not for the Father that our lives would not be woven together like a patch work quilt. I love sitting back and watching everyone and listening to the bustle of conversations knowing that we all need each other, depend on each other and are here for one another and that if I am ever in a crisis I can call on any of these girls and I know that they will come and help whatever it takes.
Tonight for the menu I prepared a broccoli cheese soup, spinach salad with apples, bacon, blue cheese and my house dressing and for dessert we had some gooey pumpkin bars with coffee. I love, love gooey butter bars. They are one of my most favorite desserts.I have always had a long time love affair with chess pie and gooey butter bars help fill that gap in my life. My local Kroger use to carry their own version of the bars and it was T-R-O-U-B-L-E. Well, tonight I decided to try out Paula De ens recipe for gooey pumpkin bars and add my own touch and they were the perfect end to a perfect night. Thank you God fort the blessing of friends. Enjoy!
1 Butter Cake Boxed Mix
1 Stick of butter melted
1 Egg
Combine all of the above and pat into a 9x13 pan.
1 8oz cream cheese at room temp
2 eggs
1 tsp vanilla
1 stick of butter melted
2 cups powdered sugar
2 tsp pumpkin pie spice
1 15 oz can pumpkin
1 dash salt
1/.4 tsp ginger
Beat cream cheese until smooth. Next add in pumpkin, eggs then the rest of the ingredients. Spread over the cake mixture. Bake at 350 for 50 minutes, the center should still be a bit gooey. Allow to cool then top with glaze.
1 cup powdered sugar
1 Tbs half and half or milk
1/2 tsp pumpkin pie spice
Stir until combined. Drizzle over cooled bars. If glaze is not coming together all the way add a splash more half and half.
Wednesday, October 27, 2010
Canned or Not Canned....there is no question! - Roasted Chicken
There are some thing that I will NEVER give you permission to do as a cook. You may not like to cook, you may not think that you are great at cooking but I will NEVER give you permission, NEVER EVER to use canned chicken. Oh my. Just typing out those words made me throw up in my mouth a bit. The thought of taking something like chicken, removing everything about it that is good, throwing it in some metal tasting brine, sealing it up and calling it a day...there are no words. I had a discussion with some friends of mine a few weeks ago about canned meat. They were trying to give me all kinds of good excuses for when they had used canned chicken and I finally had to walk away. It hurt me so. So a few days after I was in Trader Joes and decided I would once again, try canned chicken because I figured if it was going to be good by anyone Trader Joes would be the one. I can smell it a mile away in any casserole or salad but I though that TJ's would be the one to break my stone cold heart. So I made some chicken salad with the canned product the next day. Just the smell was about enough to put me over the edge. It smelled like TUNA! What the heck? So I mixed in a little of this and that and it tasted like cat food. It was terrible. I took one bite and threw the rest away wishing I had not bothered.
When a recipe calls for chicken, whether it be shredded, diced, cubed, whatever, you can always know that roasted chicken will do the trick. Not canned, Not boiled, ROASTED! Roasted chicken is SO easy and so good and will allow you easy access to every recipe. It is always best to roast chicken that is bone in, I know this may freak some of you out but the bones are what allow the meat to have such great flavor. We as a society prefer the shrink wrapped perfectly trimmed breast because they are ready to go but the bones are what make the chicken really shine. Why do you think baby back ribs and chicken wings are so good? Those bones are in there for a reason! When you roast a chicken breast with the bones (I will allow you to opt out of the skin on if that makes you happy) once it is cooked you can easily pull the breast meat right off of the bone, throw the bones away and forget you ever saw them. Promise. If you can't do the bones yet, I will allow you to use boneless skinless but the thought of what could have been will be in the back of your mind with every bite you take.
So remember:
1. No canned chicken. It is from the devil. There is nothing good or real about it. Tis the season for food drives so get your pantry cleaned out!
2. Never boil boneless skinless breasts in non flavored water. Yuck, yuck, yuck!
3. Roasted chicken is best and BONE IN roasted chicken is the very best. If bones gross you out, suck it up, put on your big girl panties and just do it.
Simple Roasted Chicken - to be used for casseroles, soups, whatever. Adjust recipe to however many chicken breasts you have.
1 Bone-in split chicken breast with skin removed or 1 boneless skinless chicken breast (still looking for a wimpy font!)
2 tsp Extra Virgin Olive Oil
1-2 shakes of salt (preferably sea salt)
3-4 grinds of fresh black pepper
Preheat oven to 425 degrees. On a foil lined baking sheet place chicken. Drizzle breast with olive oil and sprinkle on salt and pepper. For BONE IN cook for 20-25 minutes until lightly golden brown on top and firm to the touch. For boneless cook for 15-18 minutes until lightly browned and firm to the touch. Allow to cool and remove from the meat from the bone (or not) and shred, dice or cube. You can freeze the chicken in baggies and pull it out as needed for soups and casseroles so that you can easily have dinner in a flash. Enjoy!
When a recipe calls for chicken, whether it be shredded, diced, cubed, whatever, you can always know that roasted chicken will do the trick. Not canned, Not boiled, ROASTED! Roasted chicken is SO easy and so good and will allow you easy access to every recipe. It is always best to roast chicken that is bone in, I know this may freak some of you out but the bones are what allow the meat to have such great flavor. We as a society prefer the shrink wrapped perfectly trimmed breast because they are ready to go but the bones are what make the chicken really shine. Why do you think baby back ribs and chicken wings are so good? Those bones are in there for a reason! When you roast a chicken breast with the bones (I will allow you to opt out of the skin on if that makes you happy) once it is cooked you can easily pull the breast meat right off of the bone, throw the bones away and forget you ever saw them. Promise. If you can't do the bones yet, I will allow you to use boneless skinless but the thought of what could have been will be in the back of your mind with every bite you take.
So remember:
1. No canned chicken. It is from the devil. There is nothing good or real about it. Tis the season for food drives so get your pantry cleaned out!
2. Never boil boneless skinless breasts in non flavored water. Yuck, yuck, yuck!
3. Roasted chicken is best and BONE IN roasted chicken is the very best. If bones gross you out, suck it up, put on your big girl panties and just do it.
Simple Roasted Chicken - to be used for casseroles, soups, whatever. Adjust recipe to however many chicken breasts you have.
1 Bone-in split chicken breast with skin removed or 1 boneless skinless chicken breast (still looking for a wimpy font!)
2 tsp Extra Virgin Olive Oil
1-2 shakes of salt (preferably sea salt)
3-4 grinds of fresh black pepper
Preheat oven to 425 degrees. On a foil lined baking sheet place chicken. Drizzle breast with olive oil and sprinkle on salt and pepper. For BONE IN cook for 20-25 minutes until lightly golden brown on top and firm to the touch. For boneless cook for 15-18 minutes until lightly browned and firm to the touch. Allow to cool and remove from the meat from the bone (or not) and shred, dice or cube. You can freeze the chicken in baggies and pull it out as needed for soups and casseroles so that you can easily have dinner in a flash. Enjoy!
Out with the old - Homemade Meatballs
So I am a product of the 80s. I loved Punky Brewster and Muppet Babies and ate sixlets and was jealous of swatch watch owners. A food that I always associate with the 80s is ground beef, don't ask why. We ate it a lot growing up. It is cheap and since we lived on a budget it was the centerpiece of many meals. We ate tacos, lasagna, burgers, spaghetti...anything mom could think up to use up the glorious ground round. One meat product we didn't eat much and never had homemade, that I can remember are meatballs. I remember being terrified of them for years thinking that the inside would come alive once it entered my body, sort of like a watermelon seed would start to sprout if accidentally swallowed. The few meatballs I do remember were dry, tasteless and would have been great golf ball substitutes if needed. When the salesman and I got married we decided to throw our first real dinner party and invite all of our friends to show off our tiny apartment. We were so proud of our non ventilated bathroom and creepy dropped ceiling floor in one room and the fact that there were five other apartments in this one house didn't bother us a bit at the time. Since we were dirt poor we decided to make a huge bowl of spaghetti and meatballs thinking it would stretch as much as we needed it to if we had anyone show up unannounced. It was my first attempt at making meatballs. I knew I didn't have the courage yet to stick my hands in the raw meat and mix it all together so I decided I would add all of the ingredients, let the salesman mix and roll and I would take the credit for everything. And I did. And they were awesome. And that dinner party was one of the most memorable nights of our married life. Since then I have rolled hundreds of meatballs and that dish remains one of my favorite meals to cook for any guest.
Meatballs for Spaghetti - Serves 6-8 hungry hippos
1.5 lbs ground beef (I like to mix ground round for the fat and sirloin for the taste. You can also do sirloin and half Italian sausage if you like)
1/2 cup grated Parmesan
1/2 cup dry Italian seasoned breadcrumbs
1/2 cup water
2 eggs, beaten
3 Tbs fresh chopped herbs (Combo if possible of Rosemary, Basil and flat leaf Italian Parsley) if you don't have fresh you can throw in 2 tsp dried but fresh is always best
1/2 of a med. onion grated (yes, with a cheese grater- and make sure all of the juice gets in the bowl)
2 garlic cloves finely diced
1 tsp sugar
1/2 tsp cinnamon
1 tsp salt
1/2 tsp fresh ground black pepper
 Yummy Huh? This is all of the wet ingredients prior to the meat being added.
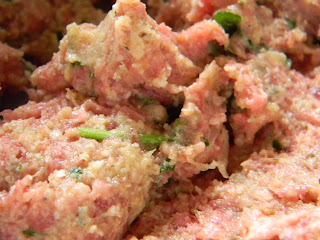 Toss all of the ingredients into a bowl. Take any jewelry off, wash your hands then shove them into the bowl and start mixing the meat together. This is the best way to make meatballs!! You want to mix it as little as possible so that the meat will stay moist.
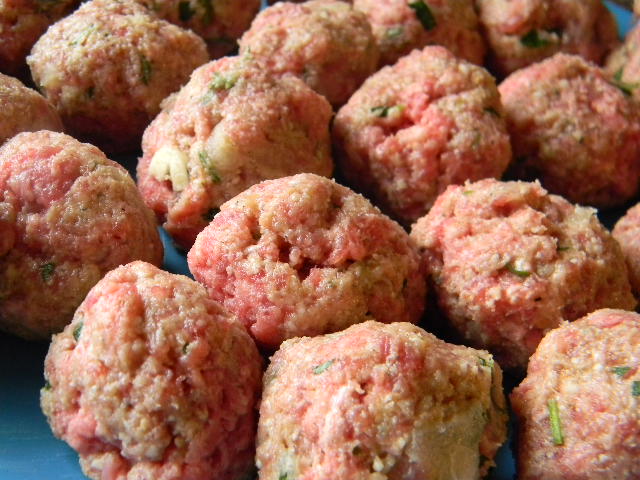
 Roll out the meatballs into golf balls size balls. We like them on the bigger side but you can do as big/small as you want.
 In a large heavy bottom saucepan on medium heat drizzle in 2-3 Tbsp olive oil. Once the oil gets warmed up (don't let it burn) start setting your meatballs into the hot oil. You don't want to crowd them so do this in two batches if your pan will not hold them all at one time. At this point DO NOT MESS WITH THEM!! You want them to sit in that hot oil and get crispy before you start moving them around so just hold on. They will need to sit still and cook for about 4-5 minutes on each side. Check one meatball, and if it easily comes up from the bottom and looks dark brown you are good, if it remotely sticks to the pan leave it alone for a few more minutes.
 Turn all of the meatballs around, you will do this approx 4 times to ensure that the entire outside gets crispy. If you have a lid or a cookie sheet you can place it on your pan and allow the steam to help cook the meatballs to ensure that they will be moist. If you are cooking the meatballs in batches, once the first batch is done you can remove those, set them on a plate and continue filling up your pan with raw meatballs until they are all cooked.

If you are going to be making a marinara sauce you will want to get your base going first then you can add in the meatballs and some of the pan drippings (that is all of the toasty bits that stuck to the bottom of the pan, but not all of the grease) to the pan to give it a good flavor. If you are not making a scratch sauce you can drain some of the fatty oil from your pan, pour in a jarred sauce then add all of your meatballs and let it all simmer together for 30 minutes and it will taste homemade (although I do highly recommend a scratch sauce).
These meatballs are good with spaghetti, on a toasted roll with melted provolone, alone with a toothpick...any way you want to eat them.
Enjoy Y'all!
Meatballs for Spaghetti - Serves 6-8 hungry hippos
1.5 lbs ground beef (I like to mix ground round for the fat and sirloin for the taste. You can also do sirloin and half Italian sausage if you like)
1/2 cup grated Parmesan
1/2 cup dry Italian seasoned breadcrumbs
1/2 cup water
2 eggs, beaten
3 Tbs fresh chopped herbs (Combo if possible of Rosemary, Basil and flat leaf Italian Parsley) if you don't have fresh you can throw in 2 tsp dried but fresh is always best
1/2 of a med. onion grated (yes, with a cheese grater- and make sure all of the juice gets in the bowl)
2 garlic cloves finely diced
1 tsp sugar
1/2 tsp cinnamon
1 tsp salt
1/2 tsp fresh ground black pepper




If you are going to be making a marinara sauce you will want to get your base going first then you can add in the meatballs and some of the pan drippings (that is all of the toasty bits that stuck to the bottom of the pan, but not all of the grease) to the pan to give it a good flavor. If you are not making a scratch sauce you can drain some of the fatty oil from your pan, pour in a jarred sauce then add all of your meatballs and let it all simmer together for 30 minutes and it will taste homemade (although I do highly recommend a scratch sauce).
These meatballs are good with spaghetti, on a toasted roll with melted provolone, alone with a toothpick...any way you want to eat them.
Enjoy Y'all!
Subscribe to:
Posts (Atom)

 Posts
Posts


